Opening Connections
Supported Protocols
All major server and cloud storage protocols are supported to connect to just about any server you want.
Toolbar Button
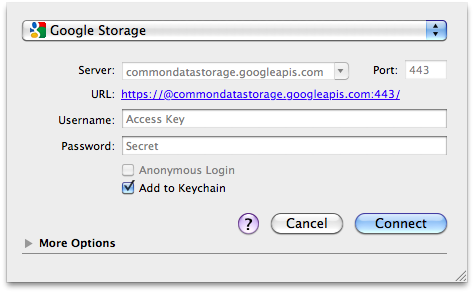
Click the New Connection toolbar button or File → Open Connection.. (mac ⌘O Windows Strg+O). If you want to open a connection in a new browser window, choose File → New Browser (macOS ⌘N Windows Strg+N) first.
Tip
Create a new bookmark instead if you need to configure additional options like Path.
Quick Connect
Type in the name of the server directly into the Quick Connect field in the toolbar. The text field will autocomplete from bookmarked hosts. You can enter a string in the format user@host, i.e. user@example.net, or a fully qualified URL such as ftp://mirror.switch.ch/mirror/. Refer to valid URI formats for input.
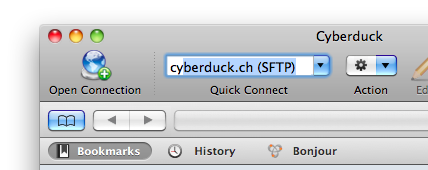
If you enter just the hostname, the default protocol as configured in Preferences → General → Connection will be used.
Bookmarks
Select Bookmarks → Toggle Bookmarks (macOS ⌘B Windows Strg+B) and double-click a bookmark to connect. If you want to bookmark a connection already open, choose Bookmark → New Bookmark (macOS ⌘⇧B Windows Strg+Shift+B) and it will add a new bookmark with the current connection settings.
Additionally, you can switch to the History or Bonjour in the bookmark view.
History
List all recently connected servers. Select a bookmark from the menu Bookmark → History or the History tab of the bookmark view.
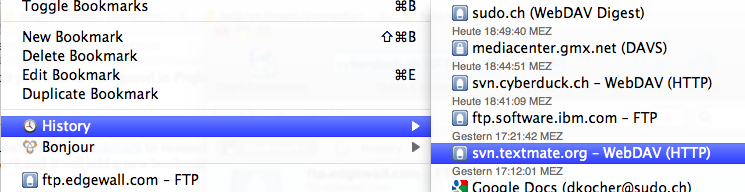
Bonjour
Auto-discovery of SFTP, FTP & WebDAV services in your local network. Discovered services appear in the Bookmark → Bonjour application menu and the Bonjour tab of the bookmark view.
Opening Connections from Finder.app
Bookmark File
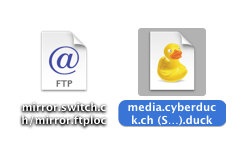
Double-click a Cyberduck .duck bookmark file in the Finder.app.
Internet Location File
Double-click an Internet Location File in the Finder.app. Cyberduck must be configured as the default protocol handler for the given protocol of the URL.
Use Spotlight
Note
The Spotlight Menu does return no results for recently connected servers in Cyberduck because it excludes indexed files located in ~/Library/Application Support/Cyberduck/History. This is also an issue for Adium.
As a workaround, you have to export all bookmarks to another location such as your Documents folder. Select all bookmarks (⌘A) in the bookmark list and drag these somewhere in your Documents folder in the Finder. You can then search bookmarks in the Spotlight Menu by nickname and hostname. Additionally, to display all bookmarks as a result search for kind:"Cyberduck Bookmark".
Application Launchers
Quicksilver
Quicksilver is a launcher application. Open the Quicksilver Preferences and install the Cyberduck Module. Then when Cyberduck is selected in Quicksilver use the right-arrow key to access bookmarks within Quicksilver.
LaunchBar
Indexing rule for Cyberduck.
From Third-Party Application
Drag an URL from any third-party application to a browser window.
Drag an URL (e.g. from Safari) to the browser list or outline view to open a new connection.
Drag an URL to the bookmarks to create a new bookmark.
Problems Connecting
Error IO Error: Broken pipe
There was a problem with the underlying network stream either because the connection was too slow or the server wouldn’t give a response anymore. Often this is caused when you run out of quota on the server - meaning that your user account is not allowed to use any more disk space.
Error IO Error: Read Timed Out
When attempting to open a connection, there is either a firewall blocking requests, or no server is listening at the given address and port. If you get this error while already connected to the server, the network connection to the server is too slow or has too high latency. You can try to increase the connection timeout in Preferences → Connection → Timeouts.
Reachability Alert
A warning sign next to the URL indicates the server may not be reachable due to a missing or invalid hostname in the Server field.
Passwords
Manage your passwords with Keychain Access.app on Mac. Refer to Keychain for Mac: Keychain Access overview.
Passwords are saved in the Credential Manager. You can view and delete your saved login information in Control Panel → User Accounts → Credential Manager → Windows Credentials.
Passwords will be autofilled as long as you choose to enable the Use Keychain option and corresponding credentials are found.
Transcript
Refer to Provide log output.
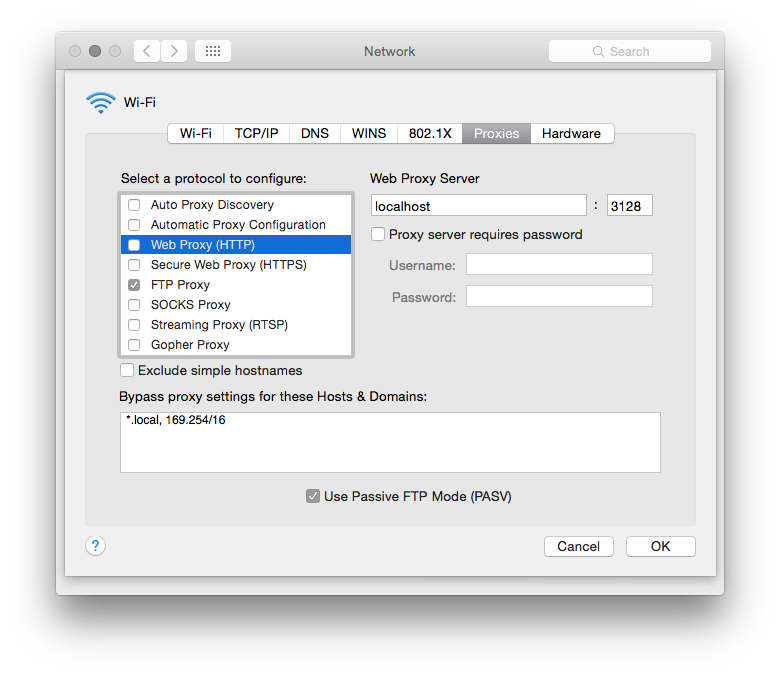
Proxy Configuration
The following proxies are supported:
SOCKS Proxy for all connections.
HTTP proxy tunneling using CONNECT for all connections.
The following proxy settings in System Preferences → Network are supported:
The option Exclude simple hostnames is respected and applies to all hostnames not fully qualified.
The hostnames and wildcards in Bypass proxy settings are applied
CIDR notations are parsed and matched against the IPv4 address of the hostname.
The Automatic Proxy Configuration using a Proxy Configuration File is currently ignored.
Enabled HTTP Connect proxy for SFTP and FTP connections
Choose FTP Proxy and select the checkbox to configure the proxy address.
All proxy settings in Internet Explorer Tools → Internet Options → Connections tab → LAN Settings button are supported. Refer to Change proxy server settings in Internet Explorer.
Integrated Windows Authentication (IWA)
Integrated Windows Authentication (IWA) for proxy authentication of HTTP connections is supported.
Preferences
Profiles
Select connection protocols to be installed in addition to the default protocols. The connection profile will be installed after enabling the corresponding checkbox. To disable a connection profile simply uncheck the checkbox. The profile will be disabled after closing the application.
Note
You cannot disable default protocols or connection profiles currently in use in any bookmark.
Connection
Use Keychain
Save passwords for connections.
Timeout
You might need to adjust the timeout to wait for an answer from the server. The default is set to 30 seconds.
Repeat Failed Networking Tasks
Failed transfers due to network connection issues such as a low latency can be chosen to be repeated with a configurable number of retries.
Proxies
Choose Cyberduck → Preferences → Connection → Use system proxy settings. No additional configuration needed.
Additional Settings
Prefer IPv6 Addresses of DNS Lookups
A hidden configuration option.
connection.dns.ipv6=true
Disable Bonjour Support
A hidden configuration option.
rendezvous.enable=false
Disable Bonjour Notifications in Notification Center and System Tray
A hidden configuration option. By default, the limit is set to allow not more than 30 notifications per minute.
rendezvous.notification.limit=0
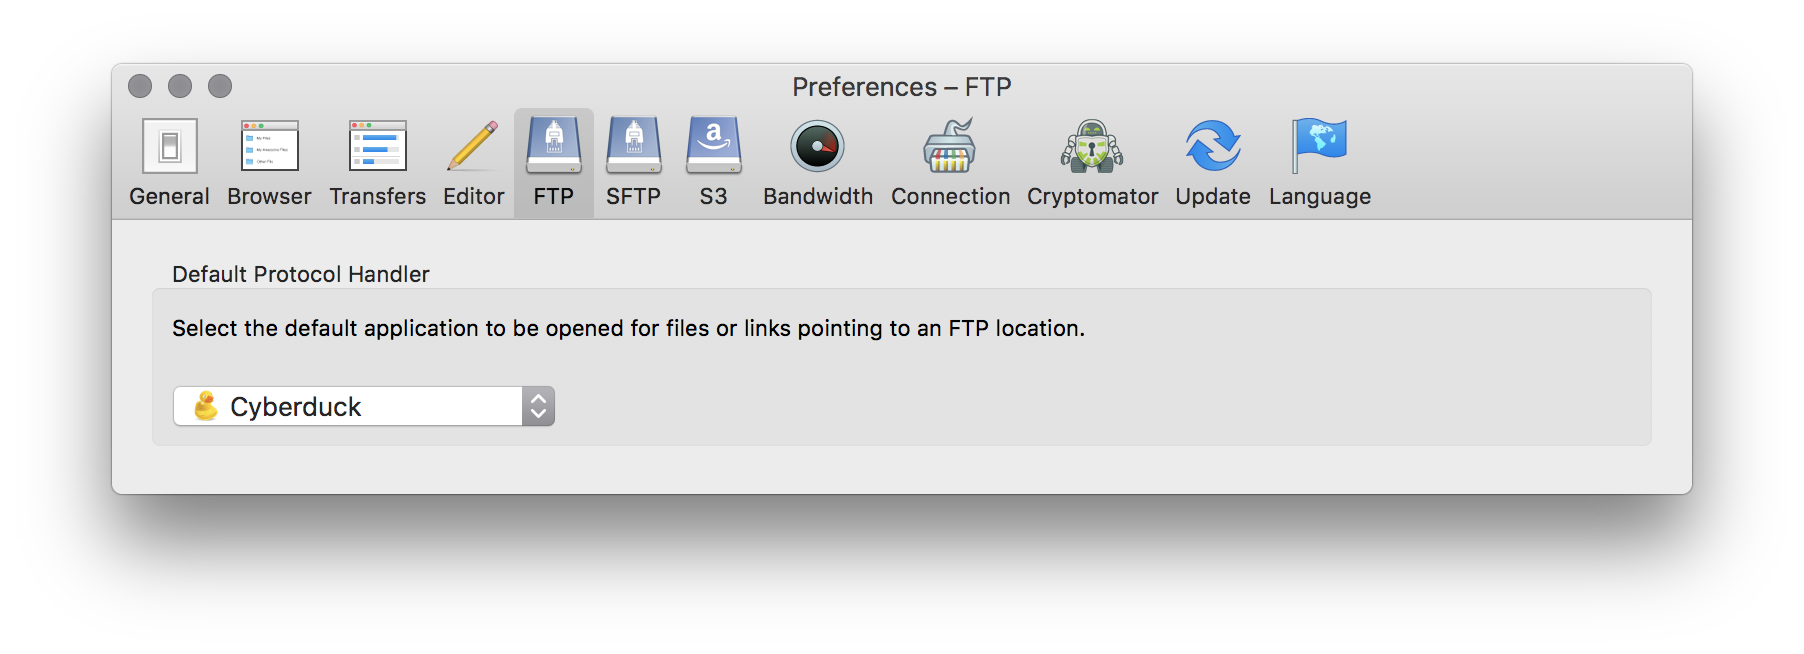
Default Protocol Handler
You can set Cyberduck or a third-party application as the default application (protocol handler) for FTP and SFTP in Preferences → FTP and Preferences → SFTP respectively.
Web Browser
When you click URLs in another application like your web browser, this application is opened to open the URL instead.
Terminal
macOS only
This also works when working in Terminal.app. Type open sftp://host to open with Cyberduck registered as the default protocol handler for SFTP.
Installation
Double-click the connection profile file (.cyberduckprofile) to open and register the profile. When using the CLI refer to the documentation.
Connection Profiles
Connection profiles (.cyberduckprofile) are plugins describing specific connection settings for a hosting provider to make it easier to setup a connection to your provider. A connection profile is installed and adds a provider option in the protocol selection drop down menu in the Connection and Bookmark panels. No need to enter the connection details manually other than credentials.
File Format
Refer to the technical documentation.